For my son’s first birthday I wanted to present him with a pair of roller skates. Not some junky clip-on skates that would cost me $50 and be trash in a mere 6 months. I wanted him to have proper roller skates. Since there isn’t much on the market that comes in infant size 4 I decided I’d build them out myself.
Here I will share with you how I built my baby skates and what you need to build your own. This could also be applied to a grown person’s skates as well. The only difference is that you often “speed” mount a plate instead of the even middle alignment I did on these skates. For a grown person, the ball of the foot over the front axle is more important. For this baby rig, we will be skipping over all of that.
EQUIPMENT LIST:
PAIR OF SHOES
ROLLER SKATE PLATE OF CHOICE
TRUCKS, BUSHINGS, PIVOT CUPS, ACTION & AXLE NUTS
MOUNTING HARDWARE (8 BOLTS & 8 LOCK NUTS)
8 WHEELS
16 BEARINGS
2 TOESTOP W/ BOLTS
MINI HACKSAW (OR BREAK-OFF TOOL)
DRILL
3/8 CRESCENT WRENCH
SKATE TOOL OR SOCKET SET FOR ACTION/AXLE NUTS
LET’S GET STARTED!
First you begin with your pair of shoes. I got a pair of black Levi canvas sneakers that I bought at Ross for about $10. I went with an infant size 6 for two reasons. My son, Moses, wears a size 4 now and I don’t want him to instantly grow out of them. Also the tiniest plate that I could find is only manufactured down to a size 7. If I went with a smaller shoe, the plate would hang over the end. This size 6 fit perfectly end to end without any plate hanging over.
The plate I ordered is a Sure Grip Nova Junior. It was the very smallest plate I could find, going down to toddler size 7. Warning: This plate is NOT cheap. The amazing thing about this project is that you will be able to reuse everything but the shoe for his next skate so your kid can size up their shoe several times before needing a new plate. So the first time you build these they are a bit pricey but every set afterwards is almost free until you need to size up your plate again. The Sure Grip Nova Junior from DerbySupply.Net is $94. While you’re already putting in an order, this is also a great place to get the plate mounting hardware you’ll need. When you order from this shop they give you twice as much mounting hardware as you need for this project since you really only need 8 nuts & 8 bolts for this plate, which means the next time you mount these when you size up you’ll have another set to use for free.
Now we must prep the shoe. Remove the laces and insole. Often the insole is glued in so you will have  to carefully pry it off. You’ll want the insert intact if possible so you can replace it after the mounting is complete.
The next step is to strip the plate down of all its removable parts except the king pins if it came full assembled. Meaning remove the actions nuts, trucks and bushings and leave the king pins and pivot cups. This will get those parts out of the way for marking up your dill holes and the bolts when mounting. Some plates come with all of the parts unassembled and bagged separately. My Nova Junior parts from DerbySupply.Net came unattached. If that is the case for your plate, you can skip this step.
 Now you will want to line up your plate with the footprint of the shoe. For me, I was working with a infant size 6 shoe and a size 7 plate so the plate goes exactly end to end on my shoe. Normally the plate would be smaller than the shoe. If you have more appropriately sized plates, you would want to line up the front axle under the ball of the foot. If your plate is too long and it hangs off the back of the heal, cheat it forward until it is all covered by shoe.
Here is a look at my plates lined up on the sole of my shoe. You can see it goes right to the edge and is aligned in the middle of the shoe. If the plates were smaller I would pay more attention to where the ball of the foot is located but since the plates are quite large for this tiny shoe, I’m going to skip that step.
MARK & DRILL HOLES
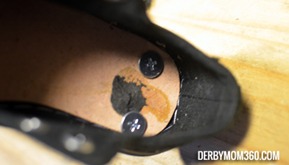
After aligning the plate as you like, mark where you’ll drill the holes for the mounting bolts. There are 4 open holes on the plate, two in front and two in the back. Since the holes are quite small, I was not able to fit my silver sharpie through them to mark on the black soles. I used sewing pins to mark the spots. I just pushed them in pretty deep right in the middle of each hole. Then when I removed the plate again I was left with 4 pins sticking out of the shoe and marked them each with silver marker before pulling the pins out.


 Now it’s time to get out your drill. In order to find the right size bit for your mounting hardware, line up the end of the bolt with the end of the drill bit. The bit should either be exactly the same size or slightly smaller. The rubber soles on these shoes gave me some wiggle room to stretch the hole a little.
You will want to drill a hole all the way through for every one of the 4 holes on each shoe. I drilled from the bottom but for some holes, the drill bit wouldn’t push all through. For those, I drilled from the inside as well. For the holes I had trouble with, I put my sewing pin back in the hole and pushed it all the way through to the inside of the shoe, marking that with a silver dot as well so I know I’ll have a straight hole front inside to out. Then I removed the pin and drilled from the interior of the shoe.
You’ll want to be careful drilling the two holes closer to the toe of the shoe. Depending on the model, you can go from drilling through the sole to straight through the whole shoe very quickly. You can stuff the shoe with a barrier if you want to be extra careful.
HARDWARE & PLATE ATTACHMENT
 Once you have the holes drilled all the way through on both shoes it’s time to insert the mounting hardware. The packet I bought from DerbySupply.Net came with enough hardware to actually mount two sets. There were 8 short and 8 long bolts. I just the 8 short for this skate. The long are for shoes like figure boots that have a large heel that you are mounting. Place one bolt through each hole with the flat head press inside the shoe. Next you’ll take your plate and line up the holes on it with the bolts sticking out. Place each bolt just slightly in the holes.
 If every hole is not drilled perfectly (and trust me, they won’t be!), this is where the rubber sole really helps you out. You’ll want to keep pushing the plate in a little at a time by each bolt until it slowly works its way closer to the sole. Do not push one bolt all the way through or you will have a lot of trouble getting the rest to line up. The rubber sole will make it so you can move the bolts around a little to get them lined up well.
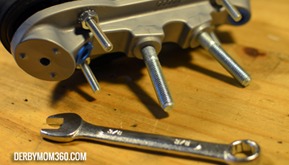 Now that your plate is affixed to your shoe. It’s time to more permanently affix it. Your mounting hardware will come with lock nuts. Screw them on by hand first. Then tighten them all the way up with a screwdriver on the inside in the bolt head and a small crescent wrench on the outside. I believe this one is a 3/8 from a set I found in my garage. You can also use the wrench to hold the nut in one place and screw from the inside with a screwdriver or drill. If using a drill, be sure it is set to a very low resistance. The shoe is made of rubber instead of leather like a skate boot, you can over tighten and start to pull through the inside of the shoe bed. So it should seem very snug but if you see the head of the bolt going way into the shoe, you’re probably tight enough.
BREAK OFF BOLTS
After all nuts are on each bolt tightly, you’ll need to cut down the bolt. There is a tool called a Bolt Break-off Tool that
 kind of looks a metal straw but I couldn’t seem to find one so I bought a Mini Hack saw for $9 at Home Depot and went that route. I sawed the bolt until it was just past halfway and then used pliers to snap it off. It doesn’t matter too much if the edge is not perfect. Just do your best to make it fairly close to the nut but not right against it. I sawed them off about two threads above it and that worked pretty well.
Once you have sawed down and snapped off all your bolts, you’re done with the hard part!
CUSHION CUPS, BUSHINGS, TRUCKS & ACTION NUTS
On each kingpin you’ll put on metal cushion cup with the flat part face down, one bushing, one truck with the tip of the pivot point placed snugly in the pivot cup, one bushing, then one cushion cup with the flat portion face up and then tighten it all down with an action nut. You’ll want it tightened down pretty snuggly but when you lean on a truck with some weight, you should be able to make them move a little bit but not a ton. That’s the “action” and for these baby skates you’ll want very little of it if any at all.
WHEELS & YOU’RE DONE!
Once you’re put all the parts on all 4 kingpins, it’s time to add the wheels. Two bearings goes in each
wheel, one on each side of the hole, and then you’ll tighten them down with the axle nut. On these baby skates, I would recommend starting them them tightened all the way down so they won’t really spin, but do your best not to dent the bearing shields. Then as your kiddo gets more comfortable walking around on their skates, you can slowly loosen the axle nut more and more until they are actually skating.
BABY SKATES COMPLETE!
Make sure you tune up roller skates like these regularly to be sure they are always safe for your kiddo. A basic inspection of the axle and action nuts along with the bolt in the toe stop will do just fine. I choose to tighten my son’s wheels down so that they really wouldn’t roll at first and have very slowly loosen them up.
Here is a slideshow of my son, Moses, receiving these roller skates for his first birthday along with a video from about 18 months when Moses started gained a bit more confidence. We have a ways to go with his “training” but it’s a start.
ENJOY!