
I saw a handful of gorgeous photos on Pinterest of babies in feather wings that totally inspired me to do an adorable Valentine photo shoot. When I looked for some online, I had trouble finding a decent option that I could get quickly which led me to making me own. It was actually very cheap and only took about an hour to make after a trip to Joann’s.
FEATHER WINGS SUPPLIES:
CARDSTOCK/CARDBOARD
SCISSORS
2′ OF ELASTIC
WHITE SPRAY PAINT (IF NOT USING WHITE CARDBOARD)
HOT GLUE GUN
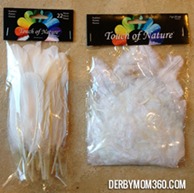
2 PACKS OF LONG FEATHERS
2 PACKS OF SMALL DOWNY FEATHERS
For me, these wings for my 9 month old son and I wanted them to look full sized on him, so I made this design at about 11″ x 8.5″. That way it fit on a standard letter sized piece of paper. You can download a print out of the outline here:
Printable: Baby Wings Pattern
You can trace it onto a piece of thin cardboard, heavier cardstock or anything that can hold up to a decent amount of hot glue. For me, my cardstock was not white, so I had to spray paint it. If you don’t, you risk seeing the color through the feathers. The white background makes it look more full from afar.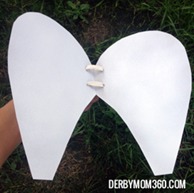
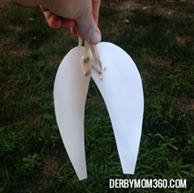
Once your wing pattern is white, you’ll have to poke/punch 4 holes for the arm straps. I used a couple feet of basic braided 1/4″ elastic and threaded it through so there would be two arm straps and just tied off the ends in a knot. I put the knot near the holes on the backside of the wings so you wouldn’t see them on his shoulders when he wore them. If you have access to clear or flesh colored elastic, even better! For me, I just went with some white elastic I had around the house already.

 Now it’s time to plug in your glue gun and get ready for the fun part: FEATHERS!
You’ll want to get out your bags of feathers and start prepping the longer ones. Usually they have a long pointy stem on them. You’ll want to remove that so the end of that stem is very close to where the actual feathers start. You won’t want to see any of that on your wings.
Now it is time to start actually gluing the feathers on. You’ll want to start on the side that does not have the arm loops (what we will call the front even though it is what you will see when you look at your kid’s back). It’s more important that the front looks full and well-laid out than the back since that’s the part you’ll see the most of.

 I started with one really nice feather pointing down to be the end. Then two that kind of follow the curve of the wings. Even though the wings don’t come down to a point in the pattern, the feathers can make it so the bottom has a nice point to it. You’re going to start from there and just keep working your way up, overlapping the next tier over the top inch or two of the last one so they look full.
You want to do your best to follow the shape of the wings so that the stems of the feather work their way toward the inner middle part of the wings where the arm loops are.
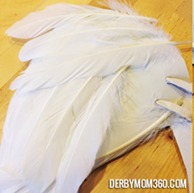 Meaning, once you get to the last tiers near the top you’ll be going almost perpendicular to the direction your first feather was placed.
Once you have layers of the bigger feathers covering all the wings, you’ll want to use the smaller downy feathers to cover up all the visible stems of the larger feathers near the top and middle. You’ll also want to cover up any edges of cardboard you can see. So the middle and the upper edge are all fluffy down feathers. Then you will repeat this same process on the other wing. You’ll want to cover up the elastic so you can’t see it but try to avoid glueing directing on top of it so it can still stretch and move some as needed.

 Your wings are nearly completely. The top side should be looking full and beautiful now and you’ll want to flip them over to do a light covering over the back side. On this side, the tiers can be more spread out and the downy feathers can be much more thinly placed if needed. The idea is just that when you see it coming up over your baby’s shoulder it looks full and feathery. So the most important part to fill more fully on the back side is the rounded higher part since you will see it in any front facing picture of your babe. Make sure as you are covering this side with feathers the keep the arm loops pulled away and free of glue.
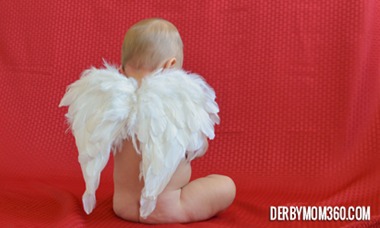 CUPID HAS ARRIVED!
Your gorgeous, handmade one-of-a-kind baby wings are complete! Next step is now to photograph your handsome little cherub. Check out the Photo Shoot link (coming soon) for tips and tricks to capture the best baby Valentine’s images.
